
Call O365 Roadmap Web Service Weekly Digest – Part 8
The Microsoft 365 Roadmap can be an invaluable source of information at times, although staying on top of the hundreds and hundreds of information it has to offer can be overwhelming. I've seen it advised by some to export the data to excel and move it to Power BI. That works great, although the context of this blog series is to have key information alert you so that there is no need for you or your team to check of your own back. With the power of Microsoft Flow, we will capture the new entries on the RSS feed and we will then send a weekly digest email.
Here is a glimpse of what the email output will look like.
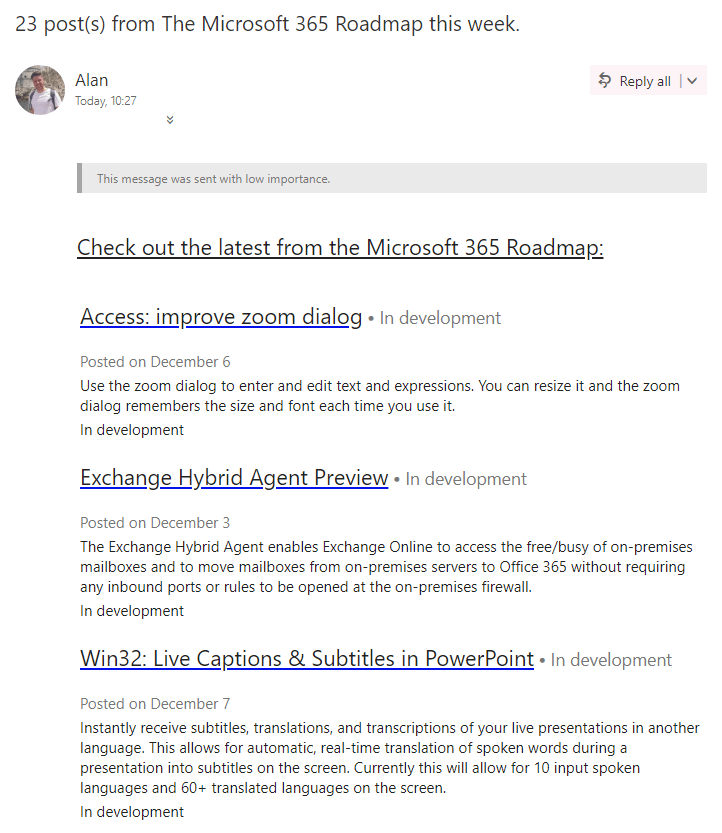
For the ID of 43977 featured here, please see this link.
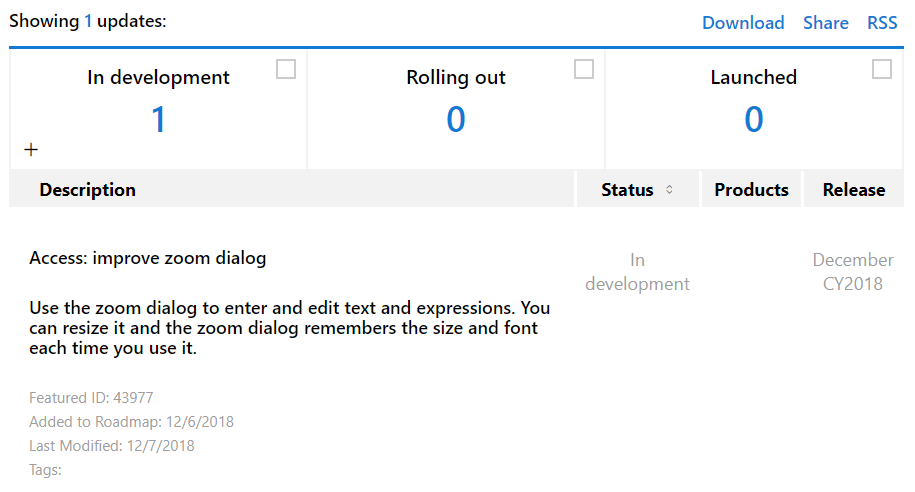
As you can see, each title is a hyperlink and directs you to the Microsoft 365 Roadmap where you can see full information as below:
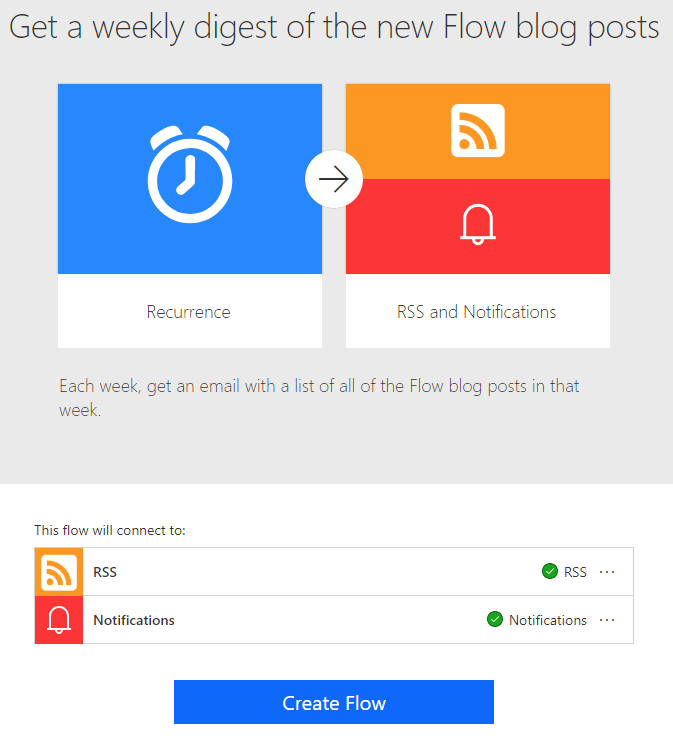
In order to get this project started, I advise starting with a template. There is a template called Get a weekly digest of the new Flow blog posts and I would advise starting with that and making modifications. Here is the Flow and it's connections that you will need to configure.
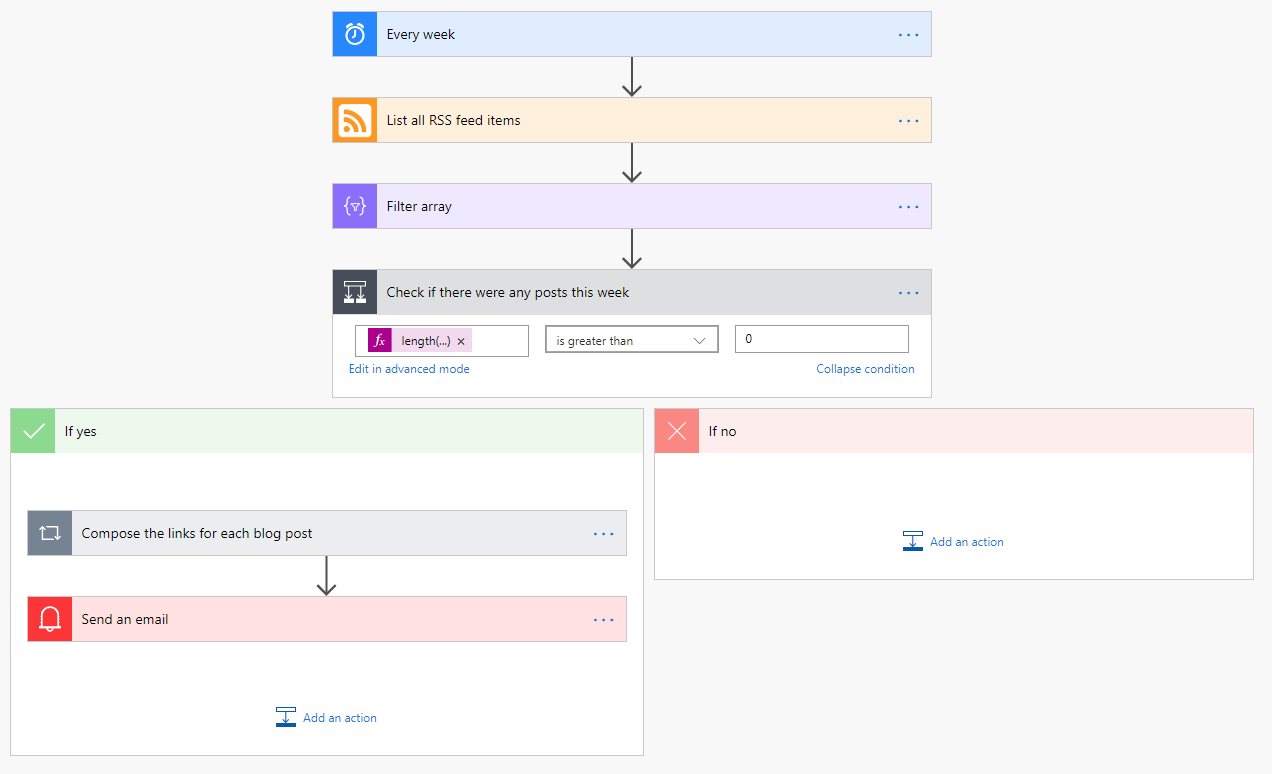
Here is the entire Flow right out the box:
Get Microsoft 365 Roadmap Required Customisations
In terms of the roadmap, I am looking for a weekly digest to drop into the mailbox once per week. I have scheduled this to run at 10am every Monday as you will see for the Recurrence trigger below:
Would you like to buy Alan a coffee?
Visit the AlanPs1 Ko-fi page
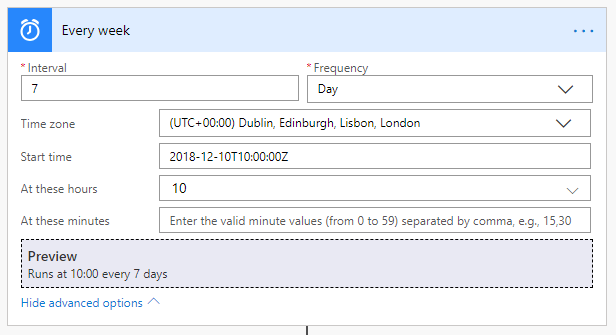
In setting the Start time and utilising At these hours, with a setting of 10am achieves that so set your recurrence to perform in the same way.
Now, on to List all RSS feed items and change the feed URI to https://www.microsoft.com/en-us/microsoft-365/RoadmapFeatureRSS.

There is no change to the following Filter Array, the settings and expression are below. You will see the expression by clicking Edit in advanced mode.
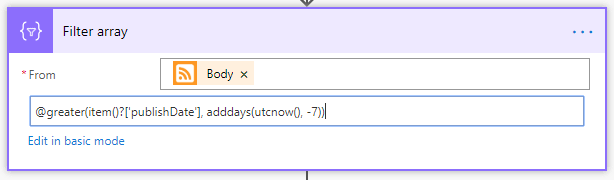
@greater(item()?['publishDate'], adddays(utcnow(), -7))
Note: If you would like to filter this array and look to output only O365 category or similar please see Flow: Filter Array on Multiple Parameters Using and().
Again no change to the initial logic in the condition called Check if there were any posts this week.
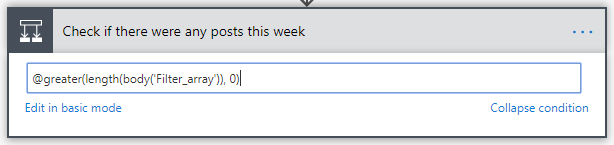
@greater(length(body('Filter_array')), 0)
EDIT: 6th February 2019 – https://www.alanps1.io/power-platform/flow/flow-so-where-has-edit-in-advanced-mode-gone-on-condition-actions/
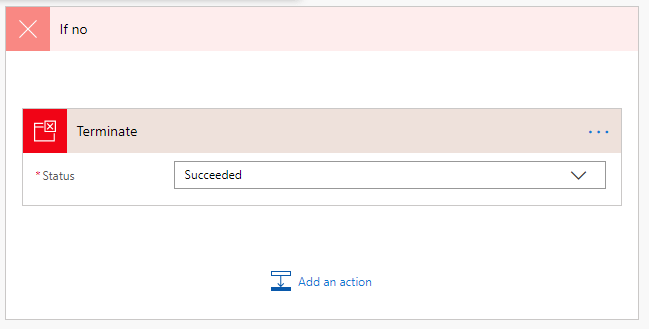
The above is just checking to make sure the contents of the RSS feed for that week is not null, hence if it were null it would return false and do no more. I find it neater to add termintate as success to the No field of the condition. This isn't in the default template so add what you see in the next image:
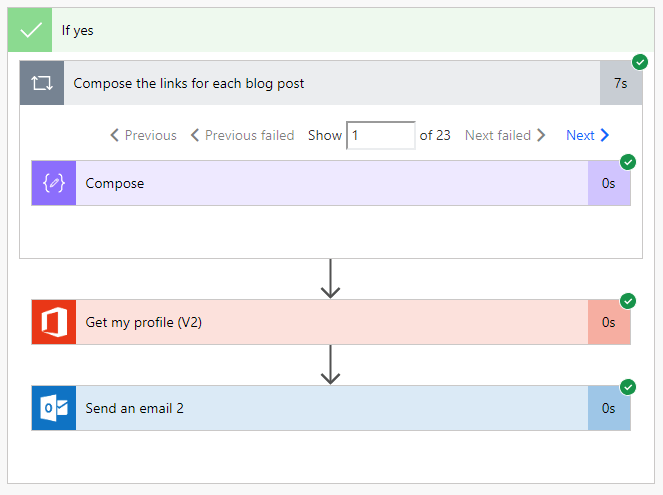
You will find that on a weekly basis, there is very little chance this Flow will return false down to the sheer volume of changes and developments that are in the pipeline for all things Microsoft 365. It is more likely the condition will return true and move on to populate and send an email. Before I show you my customisation's, here is a look at the custom Yes filed of the condition returning True, populating and sending an email.
Here are the customisation's I have made in order to generate an output in line with what was posted at the beginning of the post.
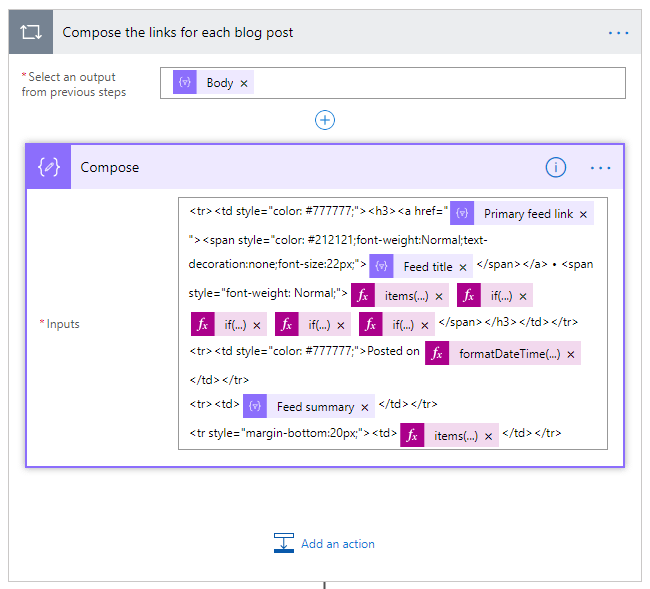
Firstly, within Compose the links for each blog post it is only within the compose action changes will be made and this.
<tr>
   <td style="color: #777777;">
      <h3><a href="@{items('Compose_the_links_for_each_blog_post')['primaryLink']}"><span style="color: #212121;font-weight:Normal;text-decoration:none;font-size:22px;">@{items('Compose_the_links_for_each_blog_post')['title']}</span></a> • <span style="font-weight: Normal;">@{items('Compose_the_links_for_each_blog_post')['categories'][0]} @{if (contains(items('Compose_the_links_for_each_blog_post')?['summary'],'Q1'),replace(items('Compose_the_links_for_each_blog_post')?['summary'], items('Compose_the_links_for_each_blog_post')?['summary'], 'Q1' ) ,null)} @{if (contains(items('Compose_the_links_for_each_blog_post')?['summary'],'Q2'),replace(items('Compose_the_links_for_each_blog_post')?['summary'], items('Compose_the_links_for_each_blog_post')?['summary'], 'Q2' ) ,null)} @{if (contains(items('Compose_the_links_for_each_blog_post')?['summary'],'Q3'),replace(items('Compose_the_links_for_each_blog_post')?['summary'], items('Compose_the_links_for_each_blog_post')?['summary'], 'Q3' ) ,null)} @{if (contains(items('Compose_the_links_for_each_blog_post')?['summary'],'Q4'),replace(items('Compose_the_links_for_each_blog_post')?['summary'], items('Compose_the_links_for_each_blog_post')?['summary'], 'Q4' ) ,null)}</span></h3>
   </td>
</tr>
<tr>
   <td style="color: #777777;">Posted on @{formatDateTime(item()?['publishDate'], 'M')}</td>
</tr>
<tr>
   <td>@{items('Compose_the_links_for_each_blog_post')['summary']}</td>
</tr>
<tr style="margin-bottom:20px;">
   <td>@{items('Compose_the_links_for_each_blog_post')['categories'][0]}</td>
</tr>
Customise the Microsoft 365 Roadmap Email Output
The code above should copy and past right into your Compose action, but there are some interesting expressions within it so I will now take a closer look at some of these. It will also help to know what the output it actually is and you'll see that there is an additional parameter that is not on display on the example email output.
You may now want to skip right on to getting the mail profile but if you would prefer the explanations then keep reading …
Note: For a more enhanced email output please see HTML Email Customisation with CSS.
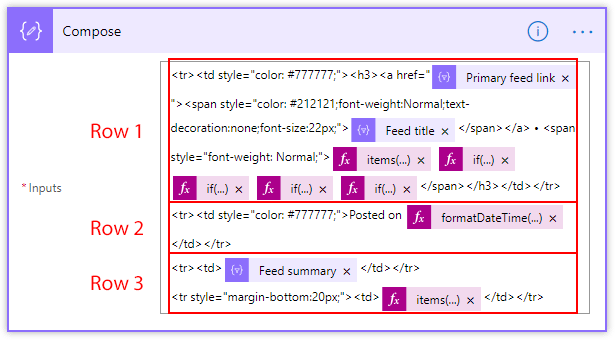
So let's break down the HTML table, firstly in the Flow editor.
And now in the email output.
In row 1, you will see to 2 dynamic content properties and 5 expressions as follows:
items('Compose_the_links_for_each_blog_post')['primaryLink']
The above is nested in an a tag so that it becomes clickable.
Then we have
items('Compose_the_links_for_each_blog_post')['summary']
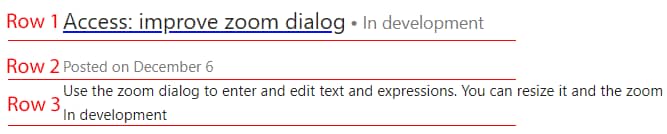
These 2 expressions represent the clickable link with text Access: improve zoom dialog.
Now for where you see In development.
items('Compose_the_links_for_each_blog_post')['categories'][0]
If you look at your XML Output, you will see that categories has multiple values. The first value is always related to it's status whether that be Launched, Rolling Out or In development. I am passing [0] to access the first value in that array.
The flowing 4 expressions after that are not to be seen in the image above. They basically list the Year and it's quarter, Q2 CY2019 on the website but not in it's XML feed. I noticed that within the description or summary, at times the value was mentioned there so here is how I will go about displaying the quarter value (Q1, Q2, Q3, Q4) if it exists.
Q1
if (contains(items('Compose_the_links_for_each_blog_post')?['summary'],'Q1'),replace(items('Compose_the_links_for_each_blog_post')?['summary'], items('Compose_the_links_for_each_blog_post')?['summary'], 'Q1' ) ,null)
Q2
if (contains(items('Compose_the_links_for_each_blog_post')?['summary'],'Q2'),replace(items('Compose_the_links_for_each_blog_post')?['summary'], items('Compose_the_links_for_each_blog_post')?['summary'], 'Q2' ) ,null)
Q3
if (contains(items('Compose_the_links_for_each_blog_post')?['summary'],'Q3'),replace(items('Compose_the_links_for_each_blog_post')?['summary'], items('Compose_the_links_for_each_blog_post')?['summary'], 'Q3' ) ,null)
Q4
if (contains(items('Compose_the_links_for_each_blog_post')?['summary'],'Q4'),replace(items('Compose_the_links_for_each_blog_post')?['summary'], items('Compose_the_links_for_each_blog_post')?['summary'], 'Q4' ) ,null)
In lehman's terms, each expression looks within the description for either Q1, Q2, Q3, Q4 respectively. If it finds a mention of the of these values, it will replace the whole description with the value and if it doesn't find the value it returns null and appears blank.
Now on to the 2nd row in the table where there is just one expression and this creates the output of the month then day, the 'M' format.
formatDateTime(item()?['publishDate'], 'M')
And the 3rd row of the table get's the description or summary.
items('Compose_the_links_for_each_blog_post')['summary']
The 4th line in the table is not required and is the same as mentioned above, you may prefer it here instead of in the title so I left it in.
So back on track with the process now …
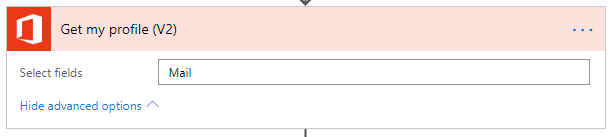
I always like to get my Office 365 profile as I think it provides a more complete approach. So, after Compose the links for each blog post but before Send an email 2 click the plus icon and add Get my profile (V2). Configure it as below:
We will now populate the email. In part we will use the Compose action above coupled with some HTML and some inline styles. I haven't used <style> in the head on this post in order to demonstrate using inline style but you can amend to suit if you so desire. There are several examples on that in the previous posts in this series.
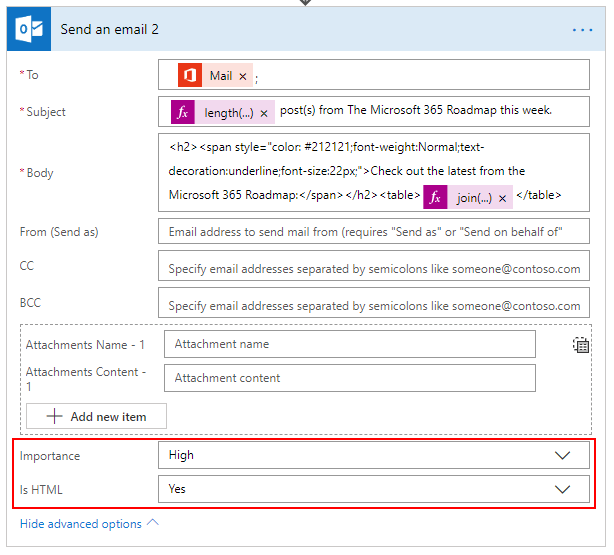
@{length(body('Filter_array'))} post(s) from The Microsoft 365 Roadmap this week.
<h2><span style="color: #212121;font-weight:Normal;text-decoration:underline;font-size:22px;">Check out the latest from the Microsoft 365 Roadmap:</span></h2>
<table>@{join(outputs('Compose'),'')}</table>
Be sure to set the Is HTML field to Yes, and as an option I always use High Importance to avoid emails clashing with non important ones but you can decide on that.
You will see that I removed the Send email action that was in the original flow and replaced it with Outlook's offering as again I find it is more feature rich and offers a more complete solution.
Now, run the Flow and you should have an email that will be inline with the image at the foot of the post.
So there we have it, this brings the 8 part series to a close and finalises the Call O365 Roadmap Web Service Weekly Digest aspect of things too. If you follow all 8 parts you will have an Admin Alerts Mailbox that can provide you, your team and maybe your business overall with greater visibility of what's going on in Office 365 both tenant wide and globally.
The next step for me on this, is to direct some of the email alerts towards Service Now and to log tickets and events to suit but that is outwith the scope of this tutorial.
If you would like to go to the first part of the series please click Create Office 365 Alerts Shared Mailbox from APIs – Part 1.
Alan
Visit the Get Help section of the Power Automate Community


