
Colour Code HTML Emails Dynamically Using CSS
When the need arises to send emails using Power Automate, the ability to colour code HTML emails dynamically using CSS may arise. In this example, I will use CSS to create a traffic light style colour coding that will visually label the several status values from the service health, health overviews. The green, amber, red approach should make it easier for the recipient of the email to determine if a service is operational or has cause for concern.
As you read on, you will see that I use CSS to colour the background of a single cell in an HTML table. This technique could be used to style any element in any way but this makes for a good demo. Let's face it, email is still probably the main way to communicate in the workplace and there will always be a need to create tabular data on the fly.
Here is a high-level view of the complete Flow:

For this simple demonstration, I have chosen to trigger the Flow using a button. If a need were to arise for you to have the Flow running on a schedule, please change the Flow to suit. I will then go on to capture the current time and convert the timezone as I will return the time in the body of the email. Depending on where in the world you are located, you may want to approach things differently here.

Any data source can be used, but to keep things simple, I am using a conceptual example of generating a real-time report of the Service Health Status for each of the M365 services that are enabled within my tenant. This data source is good for the demonstration as the serviceHealthIssue resource type has 18 values linked to the status property. These 18 status values can be grouped and portrayed as red, amber, green to show if the service is operational, there is cause for alarm or the service is experiencing issues.

Within Microsoft Graph, you will find the List healthOverviews endpoint both on v1.0 and beta. Please be sure to read the docs and apply the permissions to an Azure AD App Registration prior to making your REST API call. I will now go onto construct a graph call that will return the data we will use to colour code each status.
For the full method linking to how I construct the data in the next 2 actions, please see: The Sweetest Graph Call You've Ever Seen – Hiding Data in Flow.
Would you like to buy Alan a coffee?
Visit the AlanPs1 Ko-fi page


For the JSON schema, feel free to generate your own using "Generate from sample" or use mine. I have tidied this one up a little to avoid duplicate or unneeded values, and have limited the output to just service and status. That is all I need and am interested in using for this example.

{
    "type": "object",
    "properties": {
        "value": {
            "type": "array",
            "items": {
                "type": "object",
                "properties": {
                    "service": {
                        "type": "string"
                    },
                    "status": {
                        "type": "string"
                    }
                }
            }
        }
    }
}
The next compose block builds all the styling for the body of the email. Within the style tags, you will see 3 classes:
- row-red
- row-amber
- row-green

These classes will be applied later and are what makes colour coding possible. Once you have found some success in implementing this process, you may then want to create your own classes to suit your use case. it is within this action you will do that. See the code below:
<head>
<style>
div {
	display: block;
}
table {
	font-family: "Segoe UI", "Segoe WP", Tahoma, Arial, sans-serif;
	font-size: 12px;
	border-collapse: collapse;
	width: 90%;
	text-align: left;
}
td, th {
	border: 1px solid #ddd;
	padding: 5px;
}
th {
	background-color: #F0F0F0;
	color: black;
	font-weight:normal;
}
.row-red{
	background-color:#cc3232;
	text-align: center;
}
.row-amber{
	background-color:#e7b416;
	text-align: center;
}
.row-green{
	background-color:#2dc937;
	text-align: center;
}
</style>
</head>
There are several ways to construct an HTML table using Flow, due to the dynamic styling needs of this table I will construct the headers and each row independently, so will not be using the "Create HTML table" inbuilt action. The next action constructs the table headers.

<tr>
<th>Service</th>
<th>Status</th>
</tr>
Moving on, we will now use an "Apply to each" and I have named mine "Apply To Each Service" which will allow us to loop through each service returned from the graph endpoint. This is an important step and each tenant may report diferent services depending on what licensing is enabled within a tenant.

"Compose Status Colour Coding" has a series of nested if statements that will group all of the 18 service statuses into green amber or red. The code is below:
if(equals(items('Apply_To_Each_Service')?['status'], 'serviceRestored'), 'row-green',
if(equals(items('Apply_To_Each_Service')?['status'], 'falsePositive'), 'row-green',
if(equals(items('Apply_To_Each_Service')?['status'], 'postIncidentReviewPublished'), 'row-green',
if(equals(items('Apply_To_Each_Service')?['status'], 'resolved'), 'row-green',
if(equals(items('Apply_To_Each_Service')?['status'], 'investigating'), 'row-amber',
if(equals(items('Apply_To_Each_Service')?['status'], 'restoringService'), 'row-amber',
if(equals(items('Apply_To_Each_Service')?['status'], 'extendedRecovery'), 'row-amber',
if(equals(items('Apply_To_Each_Service')?['status'], 'investigationSuspended'), 'row-amber',
if(equals(items('Apply_To_Each_Service')?['status'], 'verifyingService'), 'row-amber',
if(equals(items('Apply_To_Each_Service')?['status'], 'mitigatedExternal'), 'row-amber',
if(equals(items('Apply_To_Each_Service')?['status'], 'mitigated'), 'row-amber',
if(equals(items('Apply_To_Each_Service')?['status'], 'resolvedExternal'), 'row-amber',
if(equals(items('Apply_To_Each_Service')?['status'], 'reported'), 'row-amber',
if(equals(items('Apply_To_Each_Service')?['status'], 'unknownFutureValue'), 'row-amber',
if(equals(items('Apply_To_Each_Service')?['status'], 'serviceDegradation'), 'row-red',
if(equals(items('Apply_To_Each_Service')?['status'], 'serviceInterruption'), 'row-red',
if(equals(items('Apply_To_Each_Service')?['status'], 'confirmed'), 'row-red',
if(equals(items('Apply_To_Each_Service')?['status'], 'serviceOperational'), 'row-green', null))))))))))))))))))
If you consider the snippet from my excel sheet below, you will see that I have grouped each status into what I see as logical red, amber, green groupings that indicate whether the service is operating, may be of concern and has issues to suit the colour coding.

Be sure to copy and past the nested if statements into an expression so you get the desired result from the demo.
Let's see what is contained within "Compose HTML Table Row":

<tr>
  <td>@{items('Apply_To_Each_Service')?['service']}</td>
  <td class="@{outputs('Compose_Status_Colour_Coding')}">@{items('Apply_To_Each_Service')?['status']}</td>
</tr>
As you will see from above. The code contains a single table row (<tr>) and within 2 cells of table data (<td>). The first cell contains the service, the second cell contains the status. The second cell has an inline CSS class applied to it. The class can be either row-re, row-amber or row-green. The class that gets applied is allocated within the nested if statements and it is this that allows for the application of the traffic light styling.
Now, all we need to do is send an email.

<html>
    @{outputs('Compose_Head')}
<body>
   <div class="outer-frame">
         <div class="bold-heading">
            <p>M365 Status | <strong>@{body('Convert_time_zone')}</strong></p>
         </div>
         <div>
             @{outputs('Compose_HTML_Table')}
         </div>
   </div>
</body>
</html>
The email that will be sent will have the colour coding applied. It will look like the below:
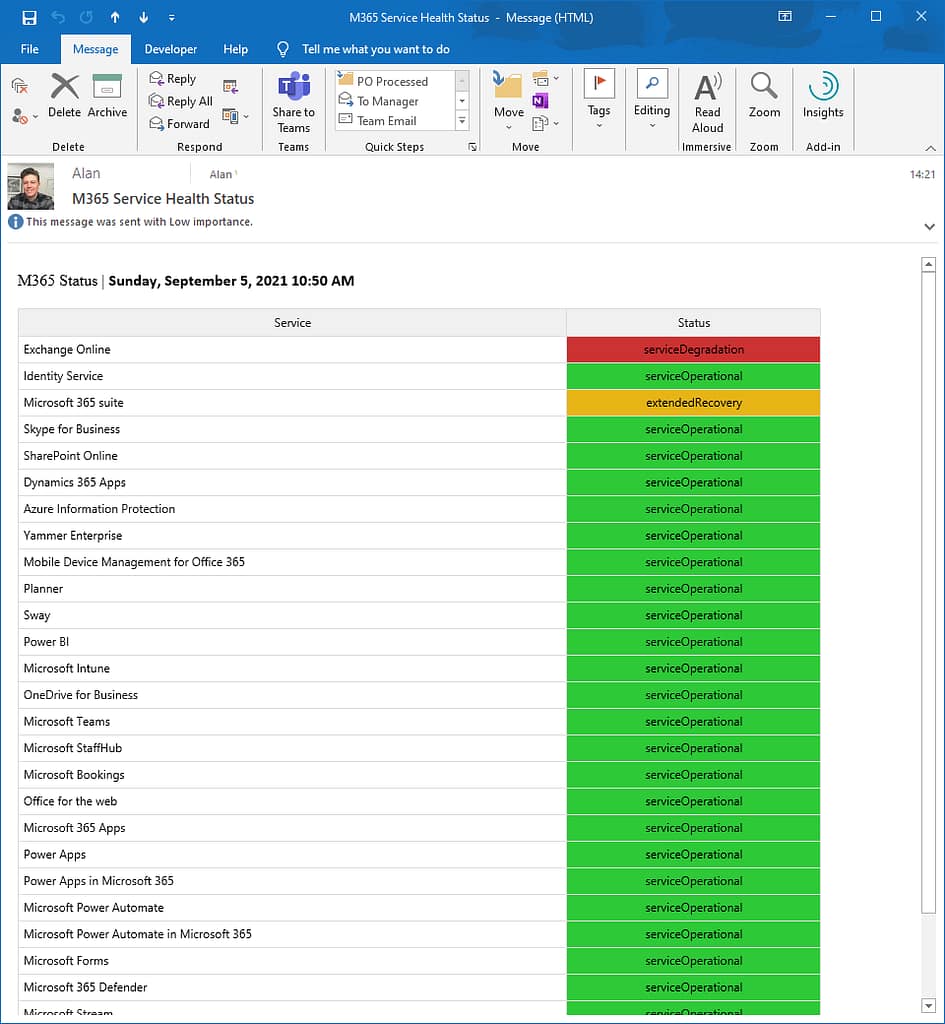
As you would expect, the majority of the M365 services are green, they are operational and in good shape. There is one area for concern and one service displaying issues. The colour coding is only made possible using a technique that will apply a unique CSS class to an element within the body of the email.
This technique can be applied to more than just emails. It could be PDF creation, Teams messages and more. I hope you have fun implementing these techniques.
Thanks for reading,
Alan
Tweet

