
Use PowerShell With ServiceNow API – How To Authenticate and Return Ticket Data
Do you have the need to query a ServiceNow ticket with PowerShell as you use ServiceNow in your organisation? If so, read on …
ServiceNow is one of the leading ITSM, ITOM & ITBM platforms on the market. The organisations I work for use it extensively for their daily ticketing system. ServiceNow helps them manage all their IT-related service requests amongst other tasks. For me, it provides an opportunity to automate the insertion of Microsoft related communications within its table-based structure.
The platform offers an API and this can be utilised in many ways. I tend to mostly write PowerShell runbooks in Azure Automation and log/audit tickets in the way described below. I do also use the Power Automate ServiceNow connector when the task is more suitable for that platform. Power Automate is a good fit when using data from Common Data Service or Dataverse.
In this blog post, I will take you through some simple steps to connect to the ServiceNow API using PowerShell. Our method below will use basic authentication. We will then search for a ticket and return data linked to that ticket.
You may find it helpful to create your own ServiceNow Developer Instance, a playground if you will. If that is the path you want to take then please see my other post titled "ServiceNow – Create Developer Instance". Once you have your ServiceNow developer instance, you may choose to work and elevate your recently created admin account. If you wish, follow the steps that I take and create and elevate your first admin user.
NB: I have used a plain text username & password in this example. I don't advocate doing this in production. This is just a demo, so please be aware of that and make sure a secure method is used when using basic authentication. Another option would be to consider using an alternative Oauth approach.
ServiceNow Table and Record Information
Just to set the scene with my example, its important to understand the format of the endpoint we will be making our GET request call to.
Would you like to buy Alan a coffee?
Visit the AlanPs1 Ko-fi page
If you have a ServiceNow Instance called contoso, you would send your GET request of to:
https://contoso.service-now.com/api/now/table | ServiceNow Developer Table API Reference.
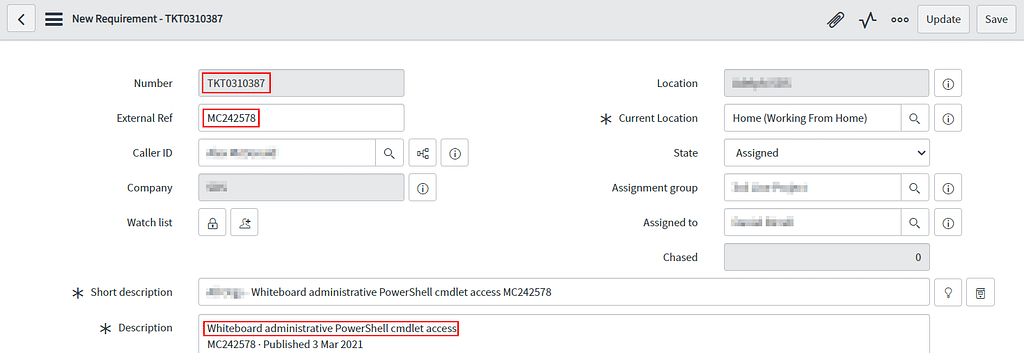
The ServiceNow test instance I am using has a custom table for 'New Requirements'. These New Requirements cater for a variety of logged service requests. In this example, one of Microsoft's Message Centre Notices has been logged here utilising a custom 'External Reference' field as you will see in the below image:
The table name within the ServiceNow meta data is actually u_new_requirement, this means the API endpoint will be …
https://contoso.service-now.com/api/now/u_new_requirement
So whilst I am using some custom fields here, you can target any table, record or value with this method. So let's get to it, let's have a look at the code and you can try it for yourself.
# Set the credentials
$User = 'contoso.adminstrator'
$Pass = 'P4ssw0rd!!'

# Set headers
$GlobalHeaders = New-Object "System.Collections.Generic.Dictionary[[String],[String]]"
$GlobalHeaders.Add('Accept', 'application/json')
$GlobalHeaders.Add('Content-Type', 'application/json')

# Build & set authentication header
$base64AuthInfo = [Convert]::ToBase64String([Text.Encoding]::ASCII.GetBytes(("{0}:{1}" -f $User, $Pass)))
$GlobalHeaders.Add('Authorization', ('Basic {0}' -f $base64AuthInfo))

# Load variable with ServiceNow instance URL
$ServiceNowInstance = 'https://contoso.service-now.com'

# Build the request body
$Body = @{
    u_external_ref = 'MC242578'
}

# Build the paramaters that will be sent off with the REST call
$Params = @{
    Headers = $GlobalHeaders
    Method  = "GET"
    Uri     = "$ServiceNowInstance/api/now/table/u_new_requirement"
    Body    = $Body
}

# Make the REST GET request
$Response = (Invoke-RestMethod @Params).Result

# Filter the response to show values that match the image ..
$Response | Select-Object number, u_external_ref, description
The response I get when I run the code above looks like the screen shot below:

You will see that the data in the response matches the values that appear in the image. This shows that the response is accurate and I welcome you to give it a go. Change the table name where you send your requests. Filter on different values, the opportunities just keep presenting themselves when using PowerShell with ServiceNow.
Thanks for reading,
Alan.
Tweet

